


This is a real breakthrough!!!!!
I own a Galaxy S2, though there are some incompatibilities with many games made only for certain platforms! Though this is only the beginning, many, if not all games, can be played from other platforms on your high end android device.
1/ Download the free version of ChainFire3D from Market (got some bugs with the cracked pro one, so for the time being, use the free one to test).
2/ Install the app, install the driver in the app, and reboot.
3/ Download the 3 plugins for TEGRA, QUALCOMM and POWERVR drivers from HERE!
4/ Place them in the root of your SD card
5/ In the app, press install plugin and wait to find them (2-5 min), then install all 3 of them
6/ In Default OpenGL settings, select use Plugin and use nVidia to do a test.
7/ Download an incompatible game, for example Samurai 2: Vengeance (Tegra only) from the Site in here! Or Fruit Ninija THD, or I don't know what :D
Test it! It will work! :D
8/ Download any other game and test. Use the appropiate driver plugin.
NOTE: There might be some incompatibilies, so not ALL other games will work. Also, if your phone's hardware does not support the games h/w requirements, of course it will not work
LE: If the game requires too much RAM, be sure to tick the "Reduce texture quality" in the app (it will halve the ram needed), it will have almost no impact on the visuals in game. Cheers.
This has been tested so far on the below listed devices and reported to work 100%. You are free to test and report even you're not in the list, it may work on any 2.1+ device.
- HTC HD2 (MDJ on NAND, Adreno200)
- Samsung Galaxy S (2.3.3, PowerVR SGX540)
- Samsung Galaxy Tab 7" (2.3.3, PowerVR SGX540)
- Samsung Galaxy S II (2.3.3, Mali-400 MP)
- Motorola Atrix 4G (2.2.1, Tegra2)
- Motorola Droid 2 (2.2.1, PowerVR SGX530)
- LG Optimus 2X (2.3.4, Tegra2)
- Nexus S
- Samsung Epic 4G
Below ARe Tested:
Samurai 2: Vengeance - works
Fruit Ninija THD - works
Pinball HD Tegra - ok
GOF 2 Tegra -ok
Backbreaker THD - ok
Guerrilla Bob THD - okAlso got my Reckless Racing working using the POWERVR driver. It didn't work before. :D
This is tested on Galaxy S2.
Recent Posts
Blogger Themes

Popular Posts
-
Tapatalk Forum App 1.12.1 Requirements: Android OS 1.5 + Overview: Tapatalk allows you to access vB, phpBB, IPB, SMF forums with Tapatalk ...
-
Tapatalk Forum App 1.12.2 Requirements: Android OS 1.5 + Overview: Tapatalk allows you to access vB, phpBB, IPB, SMF forums with Tapatalk ...
-
Tapatalk Forum App 1.12.0 Requirements: Android OS 1.5 - 2.3 Overview: Tapatalk allows you to access vB, phpBB, IPB, SMF forums with Tapat...
-
Download Android Apk And Games
-
MultiLing Keyboard 0.42 Requirements: Android OS 1.5+ Overview: Multilingual keyboard (IME). Based on Android 2.3 Gingerbread keyboard wit...
-
Better Keyboard 8 8.8.2 (Unlocked Gingerbread Edition) Requirements: Android OS 1.5 - 2.3 Overview: The best virtual keyboard for Android ...
-
Requirements: Android Overview: ENJOY THIS AWARD-WINNING SIMS EXPERIENCE ON YOUR ANDROID DEVICE! LONG LIVE THE SIMS! Enjoy hours of fun on y...
-
GO Keyboard 0.2.3 Requirements: all Android versions Overview: GO Keyboard can make your typing fast and smart. It is a must choice of And...
-
GO Keyboard 0.2.2 Requirements: Android OS Overview: GO Keyboard can make your typing fast and smart. It is a must choice of Android mobil...
-
SymbolsKeyboard & TextArt Pro 2.3.5 Requirements: for all Android versions, supports App2SD Overview: SymbolsKeyboard & TextArt, t...
Showing posts with label Tutorial. Show all posts
Showing posts with label Tutorial. Show all posts
Tuesday, 24 May 2011
Friday, 8 April 2011
How To Download From File Host Site (Filesonic, Hotfile, Duckload Etc.) Using Opera Mobile On Symbian Or Android Smartphones
Once you install Opera Mobile go into 'settings' and disable Opera Turbo and Mobile View. Then go into privacy and make sure cookies are enabled.

That's it! Then follow these instructions and download
Let's try the filesonic link.
Ok, I enter the captcha click submit


'Start download now' click on it..You can pick where to save it to or just leave the default location (SD/Download)
After it's done I can click 'Open' or 'Dismiss' if I want to view the files later.

NOTE: With filesonic you may have to enter the captcha a few times to get the download link but it will eventually download.
also fileserve, mediafire, Megaupload, hotfile and rapidshare all work.


That's it! Then follow these instructions and download
Let's try the filesonic link.
Ok, I enter the captcha click submit
'Start download now' click on it..You can pick where to save it to or just leave the default location (SD/Download)
After it's done I can click 'Open' or 'Dismiss' if I want to view the files later.
NOTE: With filesonic you may have to enter the captcha a few times to get the download link but it will eventually download.
also fileserve, mediafire, Megaupload, hotfile and rapidshare all work.
Saturday, 19 March 2011
Tutorial: Upgrade Flash BB5 phones with USB JAF
Hi! Many newbees are now using CFWs and such stuff. Since many people are interested in flashing with CFW, I thought a flashing tutorial is necessary for such noobs. Just follow the steps exactly to get a CFW running on your phone
NEEDED SOFTWARES:
1. Navifirm
2. J.A.F.
STEPS:
1. Download your f/w files from Navifirm
 2. Place all files in C:\Program Files \Nokia\phoenix\products\RM-XXX\ (RM-XXX means your RM. It may be RM-356, RM-428 etc. If your RM is RM-356; Then make the folder as 'RM-356')
3. Download and Install PKEY Emulator and J.A.F
4. Download the CFW
5. A CFW usually contain 3 or 2 files (Rofs2 + Rofs3 + UDA)
6. If the filenames do not match then rename the names of the CFW files to your original f/w files
7. backup your firmware files
8. Then replace your original files with the CFW files in "C:\Program Files\Nokia\phoenix\products\RM- XXX\"
9. Run PKEY Emulator


10. Click OK on the dialog that appears, then When J.A.F will start
11. Go to 'bb5'tab
12. Make it look exactly like the picture below (Tick - Manual Flash, Dead USB, Normal mode) (Untick - 'CRT 308')
13. Make sure the scene is exactly the same (Check nicely)
14. Tick 'USE INI'
15. Then a list will appear containing all phone models like the picture below
16. Select your phone and appropriate RM from the list
17. Turn OFF your phone and connect it to the computer via USB
18. Click on flash
19. Then Click OK when a dialog appears like on the picture below
20. Then press "Power Button" for 1 second and release
21. Flashing Procedure will start...
thats all u need to do...
IF YOUR PHONE GETS BRICKED ANYWAY, THEN FLASH YOUR PHONE AGAIN WITH ALL YOUR ORIGINAL FIRMWARE FILES
NOTE:
THIS SOFT CAN FLASH, UPGRADE, OR SOLVE PROBLEM OF ALMOST ALL BB5 PHONES
Nokia BB5 supported models:
3109c, 3110c, 3120c, 3230, 3250, 3500c, 3555, 3600s, 5200, 5220xpress, 5300xpress, 5310xpress, 5320xpress, 5500sport, 5610xpress, 5700xpress, 5800xpress, 6085, 6086, 6110navigator, 6120c, 6121c, 6124c, 6125, 6126, 6131, 6133, 6136, 6151, 6170, 6210navigator, 6220c, 6233, 6234, 6260s, 6267, 6270, 6280, 6282, 6288, 6290, 6300, 6300i, 6301, 6500c, 6500s, 6555, 6600s, 6600f, 6630, 6650f, 6680, 6681, 6682, 7260, 7310supernova, 7370, 7373, 7390, 7500prism, 7510supernova, 7610supernova, 7900prism, 8600Luna, 8800arte, E50, E51, E60, E61, E61i, E62, E63, E65, E66, E70, E71, E90communicator, N70, N71, N72, N73, N75, N76, N77, N78, N79, N80, N81, N82, N85, N90, N91, N92, N93, N93i, N95, N95-8GB, N96, N97.
Download : NaviFirm Philippe Version 0.3
Download : jaf+pkey_navzzz[disable antivirus]
NEEDED SOFTWARES:
1. Navifirm
2. J.A.F.
STEPS:
1. Download your f/w files from Navifirm

3. Download and Install PKEY Emulator and J.A.F
4. Download the CFW
5. A CFW usually contain 3 or 2 files (Rofs2 + Rofs3 + UDA)
6. If the filenames do not match then rename the names of the CFW files to your original f/w files
7. backup your firmware files
8. Then replace your original files with the CFW files in "C:\Program Files\Nokia\phoenix\products\RM- XXX\"
9. Run PKEY Emulator


10. Click OK on the dialog that appears, then When J.A.F will start
11. Go to 'bb5'tab
12. Make it look exactly like the picture below (Tick - Manual Flash, Dead USB, Normal mode) (Untick - 'CRT 308')
13. Make sure the scene is exactly the same (Check nicely)
14. Tick 'USE INI'
15. Then a list will appear containing all phone models like the picture below
16. Select your phone and appropriate RM from the list
17. Turn OFF your phone and connect it to the computer via USB
18. Click on flash
19. Then Click OK when a dialog appears like on the picture below
20. Then press "Power Button" for 1 second and release
21. Flashing Procedure will start...
thats all u need to do...
IF YOUR PHONE GETS BRICKED ANYWAY, THEN FLASH YOUR PHONE AGAIN WITH ALL YOUR ORIGINAL FIRMWARE FILES
NOTE:
THIS SOFT CAN FLASH, UPGRADE, OR SOLVE PROBLEM OF ALMOST ALL BB5 PHONES
Nokia BB5 supported models:
3109c, 3110c, 3120c, 3230, 3250, 3500c, 3555, 3600s, 5200, 5220xpress, 5300xpress, 5310xpress, 5320xpress, 5500sport, 5610xpress, 5700xpress, 5800xpress, 6085, 6086, 6110navigator, 6120c, 6121c, 6124c, 6125, 6126, 6131, 6133, 6136, 6151, 6170, 6210navigator, 6220c, 6233, 6234, 6260s, 6267, 6270, 6280, 6282, 6288, 6290, 6300, 6300i, 6301, 6500c, 6500s, 6555, 6600s, 6600f, 6630, 6650f, 6680, 6681, 6682, 7260, 7310supernova, 7370, 7373, 7390, 7500prism, 7510supernova, 7610supernova, 7900prism, 8600Luna, 8800arte, E50, E51, E60, E61, E61i, E62, E63, E65, E66, E70, E71, E90communicator, N70, N71, N72, N73, N75, N76, N77, N78, N79, N80, N81, N82, N85, N90, N91, N92, N93, N93i, N95, N95-8GB, N96, N97.
Download : NaviFirm Philippe Version 0.3
Download : jaf+pkey_navzzz[disable antivirus]
Tuesday, 15 February 2011
JBed java Emulator - Android (Run Java J2ME games or applications On Android Smartphone)
Java J2ME games or applications on Android Using JBed jar Emulator

Run Java J2ME games or applications on Android Using JBed jar Emulator
Run java games and applications on your new Android Phone or run any Java/J2ME/MIDP games or applications natively with JBed Android Java EmulatorInstallation steps:
1. Install jbed 1.20 Android
2. Click "SD card" on menu
3. Choose your JAR file
4. Install
5. Click on your installed java apps and run
Download Jbed Java Emulator Android Free
Download Jbed For Android 2.2
Download Jbed For Android 2.1
Download Jbed For Android 1.6
Download Jbed For Android 1.5
Monday, 11 October 2010
How to Copy/Paste with webOS Browser
How to Copy/Paste with webOS Browser
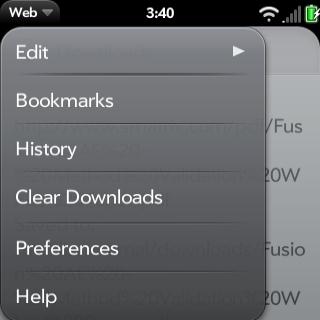
Lots of people aren't aware of the fact that you can use the Copy/Paste command just about anywhere on your Palm Pre applications. That includes the webOS browser, which features a few ways to copy paste a link, a picture or webpage text.
The first thing you need to do before copy/paste a link is to get access to that URL, so you will need to scroll all the way to the top until the URL will pop down.
Then simply tap the top bar once and so the link will be highlighted in yellow. Simply copy/paste by using the button to the right from the gesture area until the middle trackball is highlighted, then press C.
Now the URL is copied on your clipboard, so the next thing you need to do is to go where you want to paste the link, press and hold the button to the right in the gesture area of the phone until the trackball is highlighted again, then press the V key.
A faster way to copy a link is to keep the orange button pressed and tap on the desired link. A quick menu will pop-up with three options: Open in new card, Share link, and Copy URL.
The same process can be applied if you want to copy a picture. Simply keep the orange button pressed and tap on the picture until a pop-up menu will be displayed on the screen with the following options: Open in new card, Share link, Copy URL, Share image, Copy to Photos.
To copy a certain text from a webpage is a little bit tricker, as webOS only allows you to copy entire paragraphs at a time and not just one word.
Simply hold the Shift key and select the paragraph/s you wish to copy, then click on the button in the gesture area until the trackball is highlighted and click the C key.
Then simply go to where you wish to paste the text, click on the same button in the gesture area and then on the V button.
Feel free to add more tips and tricks, especially if you're an advanced webOS user.
How to Download and Save Gmail Attachments on the Memory Card
How to Download and Save Gmail Attachments on the Memory Card

If your attachment is a document file compatible with ThinkOffice, after the attachment is opened through the application you can click in the menu on the File option and choose to save to the SD card.
It seems that within the Gmail application, the save feature is dependent on file type, so if you have a picture file as attachment instead of a document file, you can click Options and download or preview.
Most of the attachments can be downloaded by using the web browser, rather then the integrated Gmail application.
Still, the easiest way to download and save any kind of attachments on the SD card is to install a third-party file manager.
If you're not yet familiar with the Astro File Manager, then you should know that this one of the most popular file managers on the Android Market.
After installing the application, simply go to Preferences and select the option that enables browser download.
This option will enable users the ability to save any kind of attachment via Gmail application, so you won't need to use the web browser every time.
Some users are simply using the Gmail through their web browser thinking that this is the quickest way to save and download attachments on their SD cards.
Still, I believe that the Astro app is a mich better choice, as the third-party application can be used for other tasks too.
How to Setup Yahoo Mail on Motorola DROID
How to Setup Yahoo Mail on Motorola DROID

After receiving the long awaited Android 2.2 Froyo software update, the critically-acclaimed Motorola DROID smartphone and one of the most popular Android devices in the US, was stripped by two of its useful features, the tethering ability, as well as the option to create Wi-Fi hotspots.
Further, if you own a Yahoo Mail account you are probably aware of the fact that you will be unable to check your email while using the Wi-Fi connection.
Basically, you will only be able to check your Yahoo account only when the smartphone is connected through the 3G data network.
For those of you that didn't manage to setup their Yahoo account yet, here is how you should do it.
The following guide assumes that you already have Yahoo Mail Plus service.
The first thing you need to do is to turn off Wi-Fi connection, so you can avoid eventual error messages and to be able to connect to the Yahoo account.
Then click on Email option, but not on the Gmail one, and enter your Yahoo login address. Select Manual Setup, and then select IMAP.
You will have to manually enter the following, under the IMAP server, imap.mail.yahoo.com.
Do not change anything else, as the port, as well as the other settings remain the same. Select Next and under SMTP enter the following, smtp.mobile.mail.yahoo.com.
Likewise, the port and other settings remain the same, so don't bother to change anything else.
Select Next and then select Account name and update settings. Congratulations, you have finished setting up your Yahoo mail account and you can start testing it.
As I have already mentioned above, Motorola DROID, as well as other Motorola Android smartphones (i.e. Motorola Devour) does not allow users to check their Yahoo mail accounts while the Wi-Fi connection is enabled.
This is a major issue that hasn't been fixed yet, and no viable explanations were received.
Saturday, 18 September 2010
[Tutorial]MOD your UC Browser For Full English Server ? Complete Tutorial By RohanAjoshi
[Tutorial]MOD your UC Browser For Full English Server ?
Tools:ZNTXhan for symbian devices, A good hex editor for JAVA devices
(I m giving tutorial with ZNTXhan cause i m symbian user, but it will same apply for java devices with Hex editor)
(If u r a s60v2 user then u dont need to uncompress exe )
Steps :
1)Unpack Sis/sisx file using Sisboom or any unpacker.
2)Go to unpacked folder=>i=>sys=>bin=>
3)copy the UcWeb60signed.exe or Ucweb60.app to "modding" folder or any folder as u want.
4)Open ZNTXhan.
5)press left softkey=>Choose Start=>*exe. [un]compress.

6)Then choose ur UcWeb60signed.exe from modding folder for uncopmress. This will take 3 to 5 seconds.
7)Now press left softkey=>Start=>Listway and select UcWeb60signed_unpack.exe. All strings from exe gets listed on screen


8)Now Left Softkey=>Replace=>ingnore Big and Small


9)Now in "find content box" put 999 and in "repalce" box put ur native BID. Eg. 351 for indian server.

10)Chooese OK for "Replace all"

11)Again Left Softkey=>Save=>Save, after saving, press right soft key for coming to home screen of ZNTXhan.

12)Done, Now u have succsefuly Changed chinese bid to ur native BID.
But this is will give u half english server. Eg. Ur Homepage is in english.
For modding exe or app for full English u need to do some few more steps as follows :
13)Press Left soft key=>Hexadecimal way and select ur saved UcWeb60signed_unpack.exe from modding folder and select modify directly.


14)Now u will get Hex editor screen on ur phone.
15) Lefi softkey=>edit=>search=>UTF-8 code.
16)Now put 2052 in "find content" box.

17)U will get 2052 string at right hand side.

18)Now click we need to edit this 2052 to ur native LCID eg. 1033 for US users. for that click on 2 and put 1, click on 5 and put 3, click on last 2 and put again 3.
19)Now Left softkey=>The next. U get to another string which have 2052. Now same do as Step 18 untill u get "Find Nothing".

20)Now Leftsoft Key=>save=>save and press right softkey for homepage of ZNTXhan.
21)press left softkey=>Choose Start=>*exe. [un]compress and choose UcWeb60signed_unpack.exe. This will compress exe.
22)Now just just rename UcWeb60signed_unpack_pack.exe to UcWeb60signed.exe and paste it into ur unpacked folder.
23)Repack the package and get fully english ucweb.
For Java modding o same same steps with every .class files. Just forget compress and uncompress steps..
Diffeerent BIDs for Different Regions :
350:INDONESIAN
351:INDIAN
352:UNITED STATES AND OTHERS
400:Russian
401:Vietnamese
999:Chinese
LCIDs For Different Regions :
2052:Chinese - People Republic of China
1033:English - US
1057:Indonesia
1081:India
1049:Rusia
1066:Vietnam
Tools:ZNTXhan for symbian devices, A good hex editor for JAVA devices
(I m giving tutorial with ZNTXhan cause i m symbian user, but it will same apply for java devices with Hex editor)
(If u r a s60v2 user then u dont need to uncompress exe )
Steps :
1)Unpack Sis/sisx file using Sisboom or any unpacker.
2)Go to unpacked folder=>i=>sys=>bin=>
3)copy the UcWeb60signed.exe or Ucweb60.app to "modding" folder or any folder as u want.
4)Open ZNTXhan.
5)press left softkey=>Choose Start=>*exe. [un]compress.
6)Then choose ur UcWeb60signed.exe from modding folder for uncopmress. This will take 3 to 5 seconds.
7)Now press left softkey=>Start=>Listway and select UcWeb60signed_unpack.exe. All strings from exe gets listed on screen
8)Now Left Softkey=>Replace=>ingnore Big and Small
9)Now in "find content box" put 999 and in "repalce" box put ur native BID. Eg. 351 for indian server.
10)Chooese OK for "Replace all"
11)Again Left Softkey=>Save=>Save, after saving, press right soft key for coming to home screen of ZNTXhan.
12)Done, Now u have succsefuly Changed chinese bid to ur native BID.
But this is will give u half english server. Eg. Ur Homepage is in english.
For modding exe or app for full English u need to do some few more steps as follows :
13)Press Left soft key=>Hexadecimal way and select ur saved UcWeb60signed_unpack.exe from modding folder and select modify directly.
14)Now u will get Hex editor screen on ur phone.
15) Lefi softkey=>edit=>search=>UTF-8 code.
16)Now put 2052 in "find content" box.
17)U will get 2052 string at right hand side.
18)Now click we need to edit this 2052 to ur native LCID eg. 1033 for US users. for that click on 2 and put 1, click on 5 and put 3, click on last 2 and put again 3.
19)Now Left softkey=>The next. U get to another string which have 2052. Now same do as Step 18 untill u get "Find Nothing".
20)Now Leftsoft Key=>save=>save and press right softkey for homepage of ZNTXhan.
21)press left softkey=>Choose Start=>*exe. [un]compress and choose UcWeb60signed_unpack.exe. This will compress exe.
22)Now just just rename UcWeb60signed_unpack_pack.exe to UcWeb60signed.exe and paste it into ur unpacked folder.
23)Repack the package and get fully english ucweb.
For Java modding
o same same steps with every .class files. Just forget compress and uncompress steps..Diffeerent BIDs for Different Regions :
350:INDONESIAN
351:INDIAN
352:UNITED STATES AND OTHERS
400:Russian
401:Vietnamese
999:Chinese
LCIDs For Different Regions :
2052:Chinese - People Republic of China
1033:English - US
1057:Indonesia
1081:India
1049:Rusia
1066:Vietnam
Tuesday, 7 September 2010
[TUTORIAL] Opera Mobile 10 - Secret settings & memory mods
Opera Mobile 10 Beta has stormed into our Symbian world providing us an amazing user experience but recent reports on the N97 are not so favorable due to the low memory effects but here is a tweak that could be used to manually configure OM to give you a little extra notch.
On the url box type opera:config

Now Opera Mobile will open some wonderful hidden screens. Here you have lots of configuration options, there are two of special interest; the first one is “disk cache” under this one you will find an option called “size” changing this from the default 4096 to 2048 seems to have a positive impact in N97´s memory usage:


Change it to 2048 from the standard default


Now go on and type opera:drives and you’ll see you’ll be able to use Opera Mobile 10 Beta as kind off a bare bones utility task manager.


Again you can try these settings on any S60 device but they’ll have a higher mileage on the s60v5
On the url box type opera:config
Now Opera Mobile will open some wonderful hidden screens. Here you have lots of configuration options, there are two of special interest; the first one is “disk cache” under this one you will find an option called “size” changing this from the default 4096 to 2048 seems to have a positive impact in N97´s memory usage:
Change it to 2048 from the standard default
Now go on and type opera:drives and you’ll see you’ll be able to use Opera Mobile 10 Beta as kind off a bare bones utility task manager.
Again you can try these settings on any S60 device but they’ll have a higher mileage on the s60v5
Tuesday, 20 July 2010
[tut] Editing Icons In S60 Themes on pc using siscontent

Editing Icons In S60 Themes
When an author creates his theme in Carebide.ui Theme edition he is allowed to specify his own icons that are used for system and 3rd party applications, folders and services. The only things he needs to know are either the application's unique identifier (UID) or folder identifiers (IDs) in order to associate the icon with the corresponding application/folder and a graphics file for that icon. When theme is applied on the device, icons specified in it replace default ones. Icons not specified in theme stay unchanged. Nowadays there are lots of Symbian applications and their amount grows every day. When an author creates his icon pack (the set of styled icons used for replacement of icons of default system and 3rd party applications and folders) he tries to support as much applications as possible. But he cannot know UIDs of all apps and he barely has time to paint icons for hundreds of applications users may have installed on their devices. At the same time users often contact authors of themes asking them to add some more icons after theme is built and released. Now it's not necessary, because you can do it yourself if you have corresponding icons for applications you would like to be changed.
This tutorial is aimed to explain how to manage icons containing in themes for S60 platform using SISContents. SISContents allows you to add new icons, replace graphics of the existing icons and delete icons containing in S60 themes. All operations are made in sis package, no unpacking or re-packaging is needed. After theoretical basis I'm going to show how to change and add some icons to Aviator theme created by tehk.
So, let's get it started.
First download the latest version of SISContents From Below Link.
Adding new icons
To add an icon to some application you need to know its unique identifier (UID) and corresponding graphics file (in SVG or SVGB format). If you don't know UID of necessary application, see Appendix to find out how to obtain it.
The information about icons is stored in the skin file of theme (with .skn extension) and the steps of adding an icon are the following:
- Open sis package of theme with SISContents and press Tools->Edit package.
- Switch to Contents tab and look for a file with .skn extension (themepackage.skn usually).
- Select this file in the list and click on View details at the bar of the buttons above (or double click on the file in the list).
- In the appeared window switch to Application icons tab. There is a list of all application icons a theme has. The empty list means that theme does not have any icons and uses system default ones. The amount of currently displayed and total icons is shown at the top of the list. Each item in the list consists of UID of application the icon is specified for, the name of that application (if it was found in the database of SISContents) and corresponding graphics resource in mif file (where images of icons are stored).

- Before adding new icon make sure it is not specified. You can use Search both by name and UID. Type first letters of application’s name or digits of UID. Searching by UID is considered to be more accurate cause, first, different versions of application may have different UIDs and, second, if application is translated into several languages, it can have different names, while SISContents has a database of names in english only (it is also possible that application’s name is not contained in the database). If application's icon already exists in the list it’s better to replace the image of icon, cause SISContents does not add an extra record but replaces an existing one.

- If you have not found application in the list, press Add application icon. In the appeared window enter UID of application or select it in the list (by clicking on Choose from list…). You should also specify an image file or if you want to use one of the existing images click on Choose image from the list of existing icons and select image in the box below.

Replacing existing icons
This function is pretty similar to adding a new icon. Select icon in the list and press Replace icon image. Specify a new image by clicking on Browse or choose one from existing images. Application UID can be changed as well. If you don't want to replace the image you may change UID only. In this case leave Icon file field blank.
Deleting icons
This feature allows you to exclude an icon from a theme. Press Delete icon and confirm your intention in the appeared message box. Since now a default icon will be used instead of one specified in a theme.
Ok, let's get to the practice now.
In this section I'm going to show how I have modified the list of icons in Aviator theme so it can better look on the screen of my Samsung i8910 HD. The original theme can be downloaded from the webpage of its author, tehk.


Theme is great (thanks for the work, tehk) but it does not have some icons of applications specific for this device. First of all, the default icon of VideoPlayer with a black solid background looks terrible on the blue background of theme. Secondly, I did not like how icons used for Podcasts and MediaBrowser looked and decided to replace them as well. You can see how theme was looking before modification on the screenshot below.

VideoPlayer is application used for playing DivX encoded videos. I wondered whether Aviator theme had an icon for popular DivX player (UID 0x2000ED5F). I opened theme in SISContents and found that icon was present. In my opinion, there is no need to have two DivX players (embedded and standalone) at the same time and I had decided just to change UID of the icon dedicated to DivX player so that it was linked to VideoPlayer. I pressed Replace icon image, in the appeared window clicked on Choose from list... and selected VideoPlayer application. I had left the Icon file field blank cause my goal was to change UID only using existing image.

After that I did the same with Podcasts. I searched for the icon of Podcasting application which is preinstalled on all Nokia phones (and thus very often painted by theme makers). But on i8910 HD it’s another application, so I had to change its UID from Nokia’s Podcasting (0x1028190B) to Samsung’s Podcasts (0x2001E44E).


Next was the icon of MediaBrowser. There were two variants of how to add it: using existing image of theme’s icon set or to add a new image. I’ll describe both. In case of using an existing image it was necessary to find one. I searched for a Gallery and found out that its image was Entry156.svgb. Ok, then it was time to add new item to the list and I pressed Add application icon. In the list of applications I selected MediaBrowser (UID 0x20018901) (remember you can search it by typing either UID or application’s name) and when window closed I clicked on Choose image from the list of existing icons. In the box below I scrolled down the list and selected Entry156.svgb. New icon was added.

Adding an icon with a new image is the same. You should just click on Load icon graphics from file, click on Browse... and specify the path to your file in SVG (or SVGB) format in the appeared dialog box.

After all modifications theme looked like on the screenshots below.

Before installing on a device theme package must be signed. The better practice would be to sign it against a self-signed certificate, which is not restricted to the list of IMEIs and thus package can be installed on any compatible device. Press Tools->Sign package in the main menu of SISContents, choose SISContents self-signed certificate in the box of signing profiles located at the right-bottom part of the tab Package and press Add signature. After that close the window, save your file and install on device.
That’s all I wanted to share with you. Don't remember that editing of applications icons is currently in beta stage. If something goes wrong feel free to contact me and report bugs. You can find my e-mail in the menu Help->About in SISContents. SISContents creates a backup file (with .bak extension) of original package in the same folder so that if your theme package is damaged somehow you can restore it.
At the end there is a list of current restrictions.
Current restrictions:
- editing of icons of folders is not supported yet; (implemented in SISContents 1.5.5)
- replacing and adding of icons in bitmap (bmp) format is not supported. Only SVG or SVGB (SVG binary encoded) icons can be used;
- deleting of icon from skin file does not delete actual icon image from mif (or mbm) resource, because in the current implementation it may cause mess of all graphics in the theme and as a result to make it unusable. Although image is still present in mif (mbm) file it is not used by operating system of device on theme rendering.
Appendix. How to find out UID of application
To add an icon of any application to a theme you need to know its UID. If you have an application installed on the device the best way to get its UID is to use task manager, such as Best Taskman (version for S60 3rd edition devices and version for S60 5th edition devices). Best Taskman has lists of opened and installed applications. Select application in the list and press Options->Application info. Among other data you will see App.UID. That's what you need. If you don’t see an application in the menu of your device and thus cannot run it to see its UID switch to Installed Apps. (Options->View->Advanced->Installed apps.). Don't forget to include hidden and ROM apps in this list (Options->Show hidden and Options->Show ROM apps). Find an application you would like to know UID for and click on it. In the window popped up you will see its UID.

If you don’t have necessary application installed on the device yet but you have its sis package open it with SISContents and find an executable file (with .exe extension). Double click on it and look at the UID3.

If sis package has several .exe files you can only guess which of them has an icon in the menu. In most cases this file has the same UID as UID of package but it is not mandatory. Try to check their UIDs in Google (theme makers publish the list of UIDs of most common applications) or install sis package on device and then see its UID. You can also try to find application by name in the database of SISContents but remember this search is not 100% accurate cause different versions of the same application may have different UIDs and it's better to know which one is installed on your device (if you enter wrong UID application's icon will not be replaced).
Subscribe to:
Posts (Atom)